- Author:
- Chris Adcock
- Subject:
- Geometry
- Material Type:
- Lesson Plan
- Level:
- Middle School
- Grade:
- 7
- Provider:
- Pearson
- Tags:
- License:
- Creative Commons Attribution Non-Commercial
- Language:
- English
- Media Formats:
- Text/HTML
Building with Polygons

Overview
Students will complete the first part of their project, deciding on two right prisms for their models of buildings with polygon bases. They will draw two polygon bases on grid paper and find the areas of the bases.
Key Concepts
Projects engage students in the application of mathematics. It is important for students to apply mathematical ways of thinking to solve rich problems. Students are more motivated to understand mathematical concepts if they are engaged in solving a problem of their own choosing.
In this lesson, students are challenged to identify an interesting mathematical problem and choose a partner or a group to work collaboratively on solving that problem. Students gain valuable skills in problem solving, reasoning, and communicating mathematical ideas with others.
Goals
- Select a project shape.
- Identify a project idea.
- Identify a partner or group to work collaboratively with on a math project.
SWD: Consider how to group students skills-wise for the project. You may decide to group students heterogeneously to promote peer modeling for struggling students. Or you can group students by similar skill levels to allow for additional support and/or guided practice with the teacher. Or you may decide to create intentional partnerships between strong students and struggling students to promote leadership and peer instruction within the classroom.
ELL: In forming groups, be aware of your ELLs and ensure that they have a learning environment where they can be productive. Sometimes, this means pairing them up with English speakers, so they can learn from others’ language skills. Other times, it means pairing them up with students who are at the same level of language skill, so they can take a more active role and work things out together. Other times, it means pairing them up with students whose proficiency level is lower, so they play the role of the supporter. They can also be paired based on their math proficiency, not just their language proficiency.
Introduction to the Project
Lesson Guide
Introduce the project, and have pairs review the project requirements.
Mathematics
Tell students that problem solving gives them opportunities to generate and answer real-world mathematical questions. Students may choose questions that use any of the mathematics they have learned so far in class.
Give students the big picture of the project:
- Goal: What is the purpose of the project?
- Explain the purpose and importance of projects.
- Encourage students to think about questions that might lend themselves to a project idea: mathematical questions that puzzle students, amuse them, or pique their curiosity.
- Timing: Discuss the amount of class time that students will devote to projects:
- One day to choose the project and their work partner or group
- One day to work on the project in class
- Two days to present and learn from the projects
- Expectations: Detail your expectations for time spent on the project outside of class.
- Grading: Outline how the project will fit into the grading scheme.
SWD: It may be helpful to break down the list of requirements into discrete sequential steps. Striving math students may be overwhelmed by the list of requirements as presented. It may also be helpful to break the list into tasks for workday 1 and workday 2. Creating separate lists that can be used as checklists will help students to self-monitor their progress and stay on task.
Opening
Introduction to the Project
In this unit, you will complete a project. For your project, you will work with a partner to construct two model buildings. At the end of the project, the class will put all the buildings together to form a city.
Here are the specific requirements for the project.
- You will make two model buildings by constructing right prisms. For one building, you will slice off part of the prism.
- Each building (prism) will have a polygon base. You will choose the type of polygon you want to use for the bases. The two buildings can have different bases.
- Your model buildings will be based on full-size buildings that you will determine the size of. The full-size buildings cannot be more than 200 feet tall. You will use a scale of 20:1—that is, 20 feet to 1 inch—to make your model buildings.
- You will make a net for each model building and use the nets to construct the buildings.
- You will find the surface area and volume of the model buildings and the full-size buildings.
Introduction to the Project
Lesson Guide
Tell students that they will be using a rubric to evaluate their projects.
- Have students open the rubric. Tell them the rubric will be used to score their project.
- Let students know that they will have a chance to customize the rubric so that it fits their problem-solving projects as closely as possible.
- Have students look through the rubric and talk about how they will be using it to evaluate their own and one another’s projects.
ELL: If ELLs don’t know what a rubric is, show one and explain how it is used. Allow ELLs to use a dictionary if they wish.
Opening
Introduction to the Project
In this unit, you will learn about scale models, building prisms from nets, and finding the surface area and volume of right prisms. You will apply this knowledge to your project. You will be given two class sessions to work on your project, but you should also work on it outside of class.
At the end of the unit, you and your partner will present your project to the class. Your teacher will use a project rubric to evaluate all the projects.
- Look through the rubric and discuss it with your classmates.
Math Mission
Lesson Guide
Discuss the Math Mission. Students choose a project partner and build the polygon bases for the model buildings in their project.
Opening
Choose a project partner and build the polygon bases for the model buildings in your project.
Build the Polygon Bases
Lesson Guide
Read the list of requirements for the project and discuss them. Make sure to mention these things:
- Today students will work with their partner to start the project. They will choose the polygon bases for each of their two buildings, draw the polygon bases on the template, glue the template to cardboard, and then find the areas of the bases. Teacher note: Remind students that they can take a snapshot of the template and sketch a rough draft of their polygon base over the template. When students are satisfied with their polygon base, they should draw the actual polygon on the 12-inch by 12-inch grid paper.
- Students will have two more class sessions to work on their project, but they should also work on it outside of class.
- In the first class session for the project, students will decide dimensions for their buildings and then use scale to calculate their model dimensions and the areas of the bases of their buildings when full size.
- The second part of the project involves students finding surface area and volume for their buildings. This will be done during a second class session after those topics have been covered.
SWD: Make sure to identify and define, if necessary, the domain-specific terms: apothem, radius, prism, right prism, polygon, base, base area, lengths, scale, and net.
ELL: It is quite difficult to hear and decode the meaning of something that is being read aloud in a foreign language. Consider giving students access to a written list of requirements for the project, so that they can read the list themselves (maybe while you read). Or you may want to read it aloud after they have had an opportunity to read and process the information.
Work Time
Build the Polygon Bases
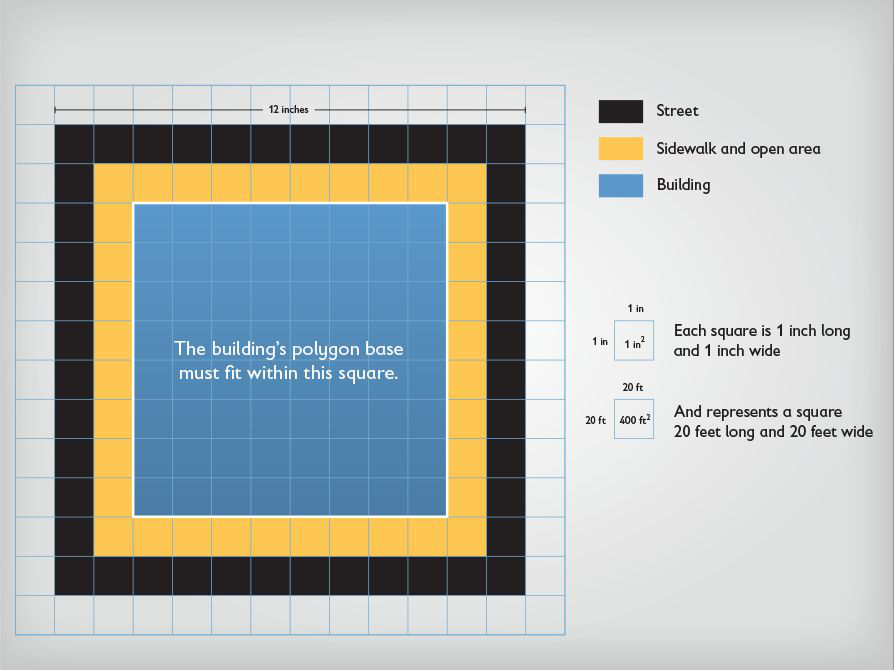
This is the template for the base of your model. Notice that the template includes areas that represent streets and sidewalks. At the end of the project, the class will join the buildings together to form a city with streets and sidewalks running between the buildings.
Today you will:
- Choose a partner.
- Choose a polygon base for each building. Remember that the polygons can be different for the two buildings. Also, you do not have to use a regular polygon.
- For each model building:
- Draw the polygon base on this template.
- Glue the template to a 12-inch-by-12-inch piece of cardboard.
- Find the area of the polygon.
Share Your Polygon Choice
Lesson Guide
Spend a few minutes having students share their polygon choices with the class.
Mathematics
Discuss the mathematics of the project. Ask questions such as these:
- What measurements and calculations will be needed? (Actual lengths, area, surface area, and volume, as well as using scale to find real measures.)
- What do you know about these measurements? (Discuss briefly what students already know about these topics from sixth grade.)
- What else do you need to know to complete the project? (Students may suggest mathematics that will be new, but they should also think about what the project entails.)
ELL: Consider presenting some of the questions in writing to support ELLs. Further, consider providing sentence frames such as the following (in the order the questions were given):
- I will need….
- What I know about the measurements is….
- I also need to know … to complete the project.
Performance Task
Ways of Thinking: Share Your Polygon Choice
Listen as your classmates share their polygon choices with the class.
Hint:
As your classmates present, ask questions such as:
- Why did you choose that polygon?
- What will you have to do to make your project successful?
Reflect On Your Work
Lesson Guide
Have each student write a brief reflection before the end of class. Review the reflections to learn what students like about their project ideas.
Work Time
Reflection
Write a reflection about the ideas discussed in class today. Use the sentence starter below if you find it to be helpful:
What I think will be challenging about this project is …